第一次全栈开发记录
简介
这是数据库原理1的课程项目,做的是一个教务网站,功能主要包括:
- 学生功能:
(1) 选课功能;
(2) 退课功能;
(3) 成绩查询功能;
(4) 课表查询功能。
- 教师功能:
(1) 查看开课详情;
(2) 录入学生成绩。
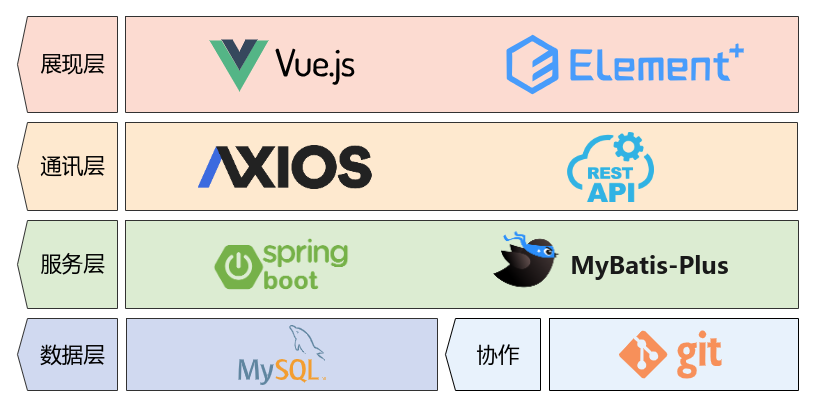
下面是主要用的技术桟,我在团队中主要负责的时技术选型、前端界面设计、前后端接口设计、数据库部分的设计、团队的代码管理。

项目设计团队协作部分记录
git团队使用问题(分支管理、常用命令、git commit信息,git stash
本地仓库初始化,连接远程仓库
# 仓库初始化
git init
# 设置远程仓库
git remote add origin https://github.com/sirius2alpha/CourseSystem.git
# 检查是否设置成功
git remote -v
# 输出
# origin	https://github.com/sirius2alpha/CourseSystem.git (fetch)
# origin	https://github.com/sirius2alpha/CourseSystem.git (push)

# 获取远程仓库的信息
git fetch origin

# 设置远程上游分支
git branch --set-upstream-to=origin/main main
# 或者可以采用
git branch -u <remote>/<branch>
# 如果出现main分支不存在的情况,则用checkout命令切换到main分支上再继续
git checkout main
# 检查上游分支设置
git branch -vv
工作区代码推送到远程仓库上
git add .
git commit -m "修改的信息"
git pull
git push
关于commit提交信息的规范:https://www.conventionalcommits.org/zh-hans/v1.0.0/
总结:
<type>(<scope>): <subject>

<body>

<footer>
大致分为三个部分(使用空行分割):
- 标题行: 必填, 描述主要修改类型和内容
- 主题内容: 描述为什么修改, 做了什么样的修改, 以及开发的思路等等
- 页脚注释: 放 Breaking Changes 或 Closed Issues
type
commit 的类型:
- feat: 新功能、新特性
- fix: 修改 bug
- perf: 更改代码,以提高性能(在不影响代码内部行为的前提下,对程序性能进行优化)
- refactor: 代码重构(重构,在不影响代码内部行为、功能下的代码修改)
- docs: 文档修改
- style: 代码格式修改, 注意不是 css 修改(例如分号修改)
- test: 测试用例新增、修改
- build: 影响项目构建或依赖项修改
- revert: 恢复上一次提交
- ci: 持续集成相关文件修改
- chore: 其他修改(不在上述类型中的修改)
- release: 发布新版本
- workflow: 工作流相关文件修改
scope
commit 影响的范围, 比如: route, component, utils, build…
subject
commit 的概述
body
commit 具体修改内容, 可以分为多行.
footer
一些备注, 通常是 BREAKING CHANGE 或修复的 bug 的链接.
分支切换
# 切换到某一次的提交记录上
git checkout [提交的sha256]

# 切换到另一分支上
git checkout [另外一个分支名字]
# 也可以用git switch来进行切换

# git stash 是用于暂存工作目录中的更改的 Git 命令,以便你可以切换到其他分支或执行其他操作。
git stash          # 暂存更改
git stash list     # 列出所有的 stash
git stash apply    # 应用最新的 stash

git stash save "你的 stash 描述"
# 并应用特定的 stash:
git stash apply stash@{2}
# 请记住,stash 是一种临时保存更改的方法,你可以根据需要应用或丢弃 stash。
要舍弃本地的所有更改并与远程仓库保持同步
确保当前分支上没有未提交的更改:
git reset --hard HEAD这将取消所有本地的未提交更改,将工作目录和暂存区恢复到最近的一次提交状态。
拉取远程仓库的最新更改:
git pull origin <分支名称>请将
<分支名称>替换为你想要同步的远程分支的名称。这将获取远程仓库的最新更改并将其合并到你的本地分支。
提交到远程仓库上时进行整理
git rebase -i HEAD~n
在这里,n 是你想要整理的提交数量。然后,你可以合并、编辑或删除提交。
请注意,使用 rebase 可能会改写提交历史,因此只有在你尚未将提交推送到远程仓库或你知道如何处理已推送更改时才应使用。如果你已经将更改推送到远程仓库,使用 rebase 可能会导致问题,因为它修改了提交的哈希值。
RESTful接口设计
前后端接口设计此次采用的时RESTful接口设计,常用的方法时GRT,POST,DELETE。API文档管理和测试用的FOXAPI平台,使用体验还行,基本的功能都能满足。下次可以试一下postman,swimm,readme等其他api管理和测试平台。
这是一个使用axios.get方法的例子,查询参数是放在params中。
async queryCourses() {
  const apiUrl = `${this.host}/api/courses`;
  const queryParams = {
.			.....
  };
  await axios.get(apiUrl, { params: queryParams })
    .then(response => {
        ......
    }, error => {
        ......
    })
},
使用axios.post的例子,请求体直接放在方法里面就可以。
const requestBody = [];

this.selectedCourses.forEach((course) => {
  requestBody.push({
    course_id: course.course_id,
    course_name: course.course_name,
    teacher_id: course.teacher_id,
    teacher_name: course.teacher_name,
    capacity: course.capacity,
    selected_number: course.selected_number,
    time: course.time,
  });
});

console.log("选课请求发送的 requestBody", requestBody);

const apiUrl = `${this.host}/api/students/${this.userId}/courses`;
const response = await axios.post(apiUrl, requestBody);
后端在接收get请求和post请求的时候对传递参数的解析方法是不一样的,get方法要从params中获取,post方法就直接从body中读取。
// GET方法
@GetMapping("/students/{userId}/courses")
public Result selectedclass(@PathVariable("userId") String userId) throws JsonProcessingException {
    List<SelectedCourses> selectno = selectedCoursesService.lambdaQuery()
            .eq(SelectedCourses::getStudentId, userId).list();
    if (selectno.size() == 0)
        return Result.fail();
    List<String> response = new ArrayList<>();
    Integer no;
    int courseid, teacherid;

    Courses courses = new Courses();

    for (int i = 0; i < selectno.size(); i++) {
        no = selectno.get(i).getCurrentCourseId();
        List<CurrentCourses> list = currentCoursesService.lambdaQuery()
                .eq(CurrentCourses::getNo, no).list();
        courseid = list.get(0).getCourseId();
        courses.setCourse_id(courseid);
        List<CoursePlan> coursesname = coursePlanService.lambdaQuery()
                .eq(CoursePlan::getCourseId, courseid).list();
        courses.setCourse_name(coursesname.get(0).getCourseName());
        teacherid = list.get(0).getTeacherId();
        courses.setTeacher_id(teacherid);
        List<Teachers> teachersname = teachersService.lambdaQuery()
                .eq(Teachers::getId, teacherid).list();
        courses.setTeacher_name(teachersname.get(0).getName());
        courses.setCapacity(50);
        no = list.get(0).getNo();
        List<SelectedCourses> selectno1 = selectedCoursesService.lambdaQuery()
                .eq(SelectedCourses::getCurrentCourseId, no).list();
        courses.setSelected_number(selectno1.size());
        courses.setTime(list.get(0).getTime());
        ObjectMapper mapper = new ObjectMapper();
        String json = mapper.writeValueAsString(courses);
        response.add(i, json);
    }

    return selectno.size() > 0 ? Result.suc(response, selectno.size()) : Result.fail();
}

// POST方法
@PostMapping("/students/{userId}/courses")
public Result selectedclass(@PathVariable("userId") String userid,
        @RequestBody List<Courses> courses) {
    Integer i = null;
    if (userid != null) {
        i = Integer.valueOf(userid);
    }
    for (int j = 0; j < courses.size(); j++) {
        List<SelectedCourses> selectno = selectedCoursesService.lambdaQuery()
                .eq(SelectedCourses::getStudentId, userid).list();
        for (int k = 0; k < selectno.size(); k++) {
            List<CurrentCourses> curtime = currentCoursesService.lambdaQuery()
                    .eq(CurrentCourses::getNo, selectno.get(k).getCurrentCourseId()).list();
            // 重复选择同一门课
            if (Objects.equals(curtime.get(0).getCourseId(), courses.get(j).getCourse_id()))
                return Result.fail("已选择该课程");
            // 选课时间冲突
            else if (Objects.equals(curtime.get(0).getTime(), courses.get(j).getTime()))
                return Result.fail("选课时间冲突");
        }
        List<CurrentCourses> selectcourse = currentCoursesService.lambdaQuery()
                .eq(CurrentCourses::getTime, courses.get(j).getTime())
                .eq(CurrentCourses::getCourseId, courses.get(j).getCourse_id())
                .eq(CurrentCourses::getTeacherId, courses.get(j).getTeacher_id()).list();
        List<SelectedCourses> selectedCourse = selectedCoursesService.lambdaQuery()
                .eq(SelectedCourses::getStudentId, userid)
                .eq(SelectedCourses::getCurrentCourseId, selectcourse.get(0).getNo()).list();
        List<SelectedCourses> num = selectedCoursesService.lambdaQuery()
                .eq(SelectedCourses::getCurrentCourseId, selectcourse.get(0).getNo()).list();
        if (num.size() == 50)
            return Result.fail("课程容量已满");
        SelectedCourses selectedCourses = new SelectedCourses();
        if (selectedCourse.size() > 0)
            return Result.fail();
        else {
            selectedCourses.setCurrentCourseId(selectcourse.get(0).getNo());
            selectedCourses.setStudentId(i);
            selectedCourses.setKscj(null);
            selectedCourses.setPscj(null);
            selectedCourses.setScore(null);
            boolean savecourse = selectedCoursesService.save(selectedCourses);
            if (savecourse)
                continue;
            else
                return Result.fail();
        }

    }
    return Result.suc();
}

// DELETE方法
@DeleteMapping("/students/{userId}/courses")
public Result delcourse(@RequestBody List<Courses> courses,
        @PathVariable("userId") String userid) {
    Integer i = null;
    if (userid != null) {
        i = Integer.valueOf(userid);
    }
    for (int j = 0; j < courses.size(); j++) {
        List<CurrentCourses> selectcourse = currentCoursesService.lambdaQuery()
                .eq(CurrentCourses::getTime, courses.get(j).getTime())
                .eq(CurrentCourses::getCourseId, courses.get(j).getCourse_id())
                .eq(CurrentCourses::getTeacherId, courses.get(j).getTeacher_id()).list();
        List<SelectedCourses> selectedCourse = selectedCoursesService.lambdaQuery()
                .eq(SelectedCourses::getStudentId, userid)
                .eq(SelectedCourses::getCurrentCourseId, selectcourse.get(0).getNo()).list();
        if (selectedCourse.size() == 0)
            return Result.fail();
        else {
            Map<String, Object> selmap = new HashMap<>();
            selmap.put("student_id", i);
            selmap.put("current_course_id", selectcourse.get(0).getNo());
            boolean savecourse = selectedCoursesService.removeByMap(selmap);
            if (savecourse)
                continue;
            else
                return Result.fail();
        }
    }
    return Result.suc();
}
前端部分问题记录
路由传参问题
在Web开发中,路由传参是一种将数据传递到Web应用程序的特定页面或组件的方式。具体的方式可能因框架或库的不同而异,以下是一些常见的路由传参方式:
路径参数(Path Parameters):
- 将参数直接包含在URL路径中,通常由冒号(:)标识。这些参数可以通过路由处理器提取和解析。
/users/:userId在这个例子中,
:userId是一个路径参数,它可以被替换为具体的用户ID,比如/users/123。查询参数(Query Parameters):
- 将参数追加到URL的末尾,通常以问号(?)开始,参数之间用和号(&)分隔。
/search?query=example&page=1在这个例子中,
query和page是查询参数。请求体(Request Body):
- 对于POST请求或其他HTTP方法,参数可以通过请求体传递。这对于传递较大的数据或复杂的对象很有用。
{
  "username": "john_doe",
  "password": "secret"
}
这是一个JSON格式的请求体示例。
Cookie:
- 通过HTTP Cookie传递参数。Cookies是在客户端和服务器之间交换的小型数据片段,可以包含有关用户的信息。
Set-Cookie: username=john_doe; path=/在这个例子中,
username是一个Cookie,它可以在后续请求中被服务器读取。状态管理(State Management):
- 使用状态管理库(如React中的Redux)或框架提供的状态管理工具,将参数保存在全局状态中,以便在整个应用程序中共享和访问。
组件传递参数和URL的关系
这里想说两个传递参数的问题,一个是vue的各个组件之间传递参数,另外一个是通过this.$router.push方法如何传递。
在vue的父子组件中,通过props进行传递
在父组件的template中,在标签中通过 :参数 的方法进行传递参数。
<div v-else-if="selectedFunction === '成绩查询'">
     <StudentQueryScore :myCourses="myScores"></StudentQueryScore>
</div>

<script>
import StudentQueryScore from "./StudentQueryScore.vue";

export default {
  name: "StudentPages",
  components: {
    StudentQueryScore,
  },

</script>
在子组件中的props中,进行接收,就可以在该文件中用this.myCourses进行使用。
<script>
export default {
    name: "studentQueryScore",
    props: {
        myCourses: {
            type: Array,
            required: true,
        },
    },
};
</script>
通过this.$router.push方法传递
这是在逻辑上处理页面跳转,就没用到在template中的点击组件的方法,而是在中进行判断直接跳转,就用到了this.$router.push方法。
// 处理登录成功后的逻辑
if (response.data.data.roleId === 1) {
  this.$router.push({ name: 'students', params: { userId: id, userName: response.data.data.userName } });
}
else {
  this.$router.push({ name: 'teachers', params: { userId: id, userName: response.data.data.userName } });
}
该方法需要在路由中进行设置,把需要传递的参数写到path上。同时在成功登陆后网站的URL也会出现该用户的ID和姓名。这个方法可以保证网站在该页面刷新之后信息不会丢失。但是缺点就是不太美观。
// router/index.js
import { createRouter, createWebHistory } from 'vue-router'
import IndexLogin from '@/views/IndexLogin.vue'

const routes = [
  {
    path: '/',
    name: 'home',
    component: IndexLogin
  },
  {
    path: '/students/:userId/:userName',
    name: 'students',
    component: () => import('../views/StudentPages.vue'),
  },
  {
    path: '/teachers/:userId/:userName',
    name: 'teachers',
    component: () => import('../views/TeacherPages.vue'),

  },
]

const router = createRouter({
  history: createWebHistory(process.env.BASE_URL),
  routes: routes
})

export default router
改进的方法也有:
隐藏参数值:
- 如果用户ID和姓名不是敏感信息,你可以考虑对它们进行某种形式的哈希处理,以将其值隐藏在URL中。这样可以增加一定的安全性。
使用查询参数:
- 考虑将用户ID和姓名放在查询参数中而不是路径参数中。查询参数的形式在某种程度上可以更灵活,也可能更符合美观的设计。
plaintextCopy code
/profile?userId=123&username=john_doe
使用状态管理:
- 使用前端的状态管理库,例如React中的Redux,可以在不显示在URL中的情况下保持应用程序的状态。这样可以避免在URL中公开敏感信息。
Session 或 Cookie:
- 将用户ID和姓名存储在会话(session)中或通过Cookie进行管理。这样信息将在服务器端或客户端之间传递,而不会直接显示在URL中。
element-plus UI使用
网站的UI框架可以在很大程度上帮助我不用过多考虑样式的美观,只需要使用框架中提供好的样式就可以了。
浏览器调试前端界面
在浏览器控制台可以进行对应的调试,我这次主要采用的方式主要是console.log的方式进行,检查关键数据是否正确。
断点的方式也行。
更换网站logo记录
更换网站logo是在/public/index.html中直接设置,
<!--更换icon为/public/favicon.ico-->
<link rel="icon" href="<%= BASE_URL %>favicon.ico">
json数组解析,map映射,直接赋值
后端通过接口传递过来的数据在response.data.data中。可以把response.data打印在控制台上看他里面的结构,再进行解析。
有时候传递过来的结构体可以直接进行赋值,也可以通过map映射到结构体上,也可以通过解析json的方式进行。
// example 1
const courseData = response.data.data;

this.courseInfo = courseData.map((course) => {
  const selectedCourse = JSON.parse(course);
  return {
    course_id: selectedCourse.course_id,
    course_name: selectedCourse.course_name,
    teacher_id: selectedCourse.teacher_id,
    teacher_name: selectedCourse.teacher_name,
    capacity: selectedCourse.capacity,
    selected_number: selectedCourse.selected_number,
    time: selectedCourse.time
  };
});

// example 2
const scoreData = response.data;
this.myScores = scoreData.data.map(score => JSON.parse(score));
后端部分问题记录
maven项目构建
主要不是在负责后端项目,所以对后端的一些细节不清楚。这次我们团队使用maven进行项目构建,主要的依赖和配置文件都是在pom.xml文件中,然后使用maven build等命令安装依赖让项目跑起来。